Getting Started
Work-in-progress
When setting up documentation for a mod with Lavender, the very first step you need to take is creating the required file structure in your mod's resource pack. To begin, create a lavender directory in your mod's assets. To this, you can now add the following subdirectories:
-
books
This is where all book definitions go - for every book you want your mod to declare you place a single.jsonfile in here, the format on which is outlined in the next section. -
entries/<book name>/
This is where you place your entries, potentially further organized into subdirectories. The entry format is briefly described below, but to get the full details you might want to check out the respective article. -
categories/<book name>/
All category definitions belong in here. Categories are used to group entries together, and work in much the same way (except that they don't support multiple pages) -
structures
Structure definitions offer an easy way to display the layout of a multi-block structure to the reader and preview it in the world
For entries and categories, as you can see, you place the files in a second subdirectory which is named like your book definition. That is, if your book is defined in a file called my_book.json, its entries will go into lavender/entries/my_book/
Creating the Book Definition
To make your first book, create its book definition (for this example we'll be making my_book.json) and give it the required content:
Yes, that is in fact all that's required for a minimal book definition - you just need to tell Lavender somehow that your book exists at all. Of course, there are some other properties you can set, but none of them are mandatory:
| Property | Description |
|---|---|
| texture | This is used to decide which texture to use for the GUI of your book. There are some built into Lavender following the lavender:textures/gui/<color>_book.png template |
| display_completion | If some or all entries of your book are locked behind advancements, you can set this to true to make the book display a completion bar on the main index page and separately for each category |
| dynamic_book_model | Lavender has a built-in book, the dynamic book, which uses NBT data to emulate any book currently loaded into the game. This is primarily of interest if you are a modpack developer and thus cannot register your own book item through Lavender's API. You can set this property to another item model's ID (e.g. mymodpack:my_book_model -> assets/mymodpack/models/item/my_book_model.json) to make the dynamic book use said model when it is emulating your book |
| dynamic_book_name | The name the dynamic book should display when it is set to emulate your book. This property expects a Minecraft text object (which can also be just a plain string) |
| extend | Should you be adding content to another mod with a Lavender guidebook, you can set this property to extend the original mod's book with your own entries and categories. To read more on how this works, look at the respective article |
Adding Entries
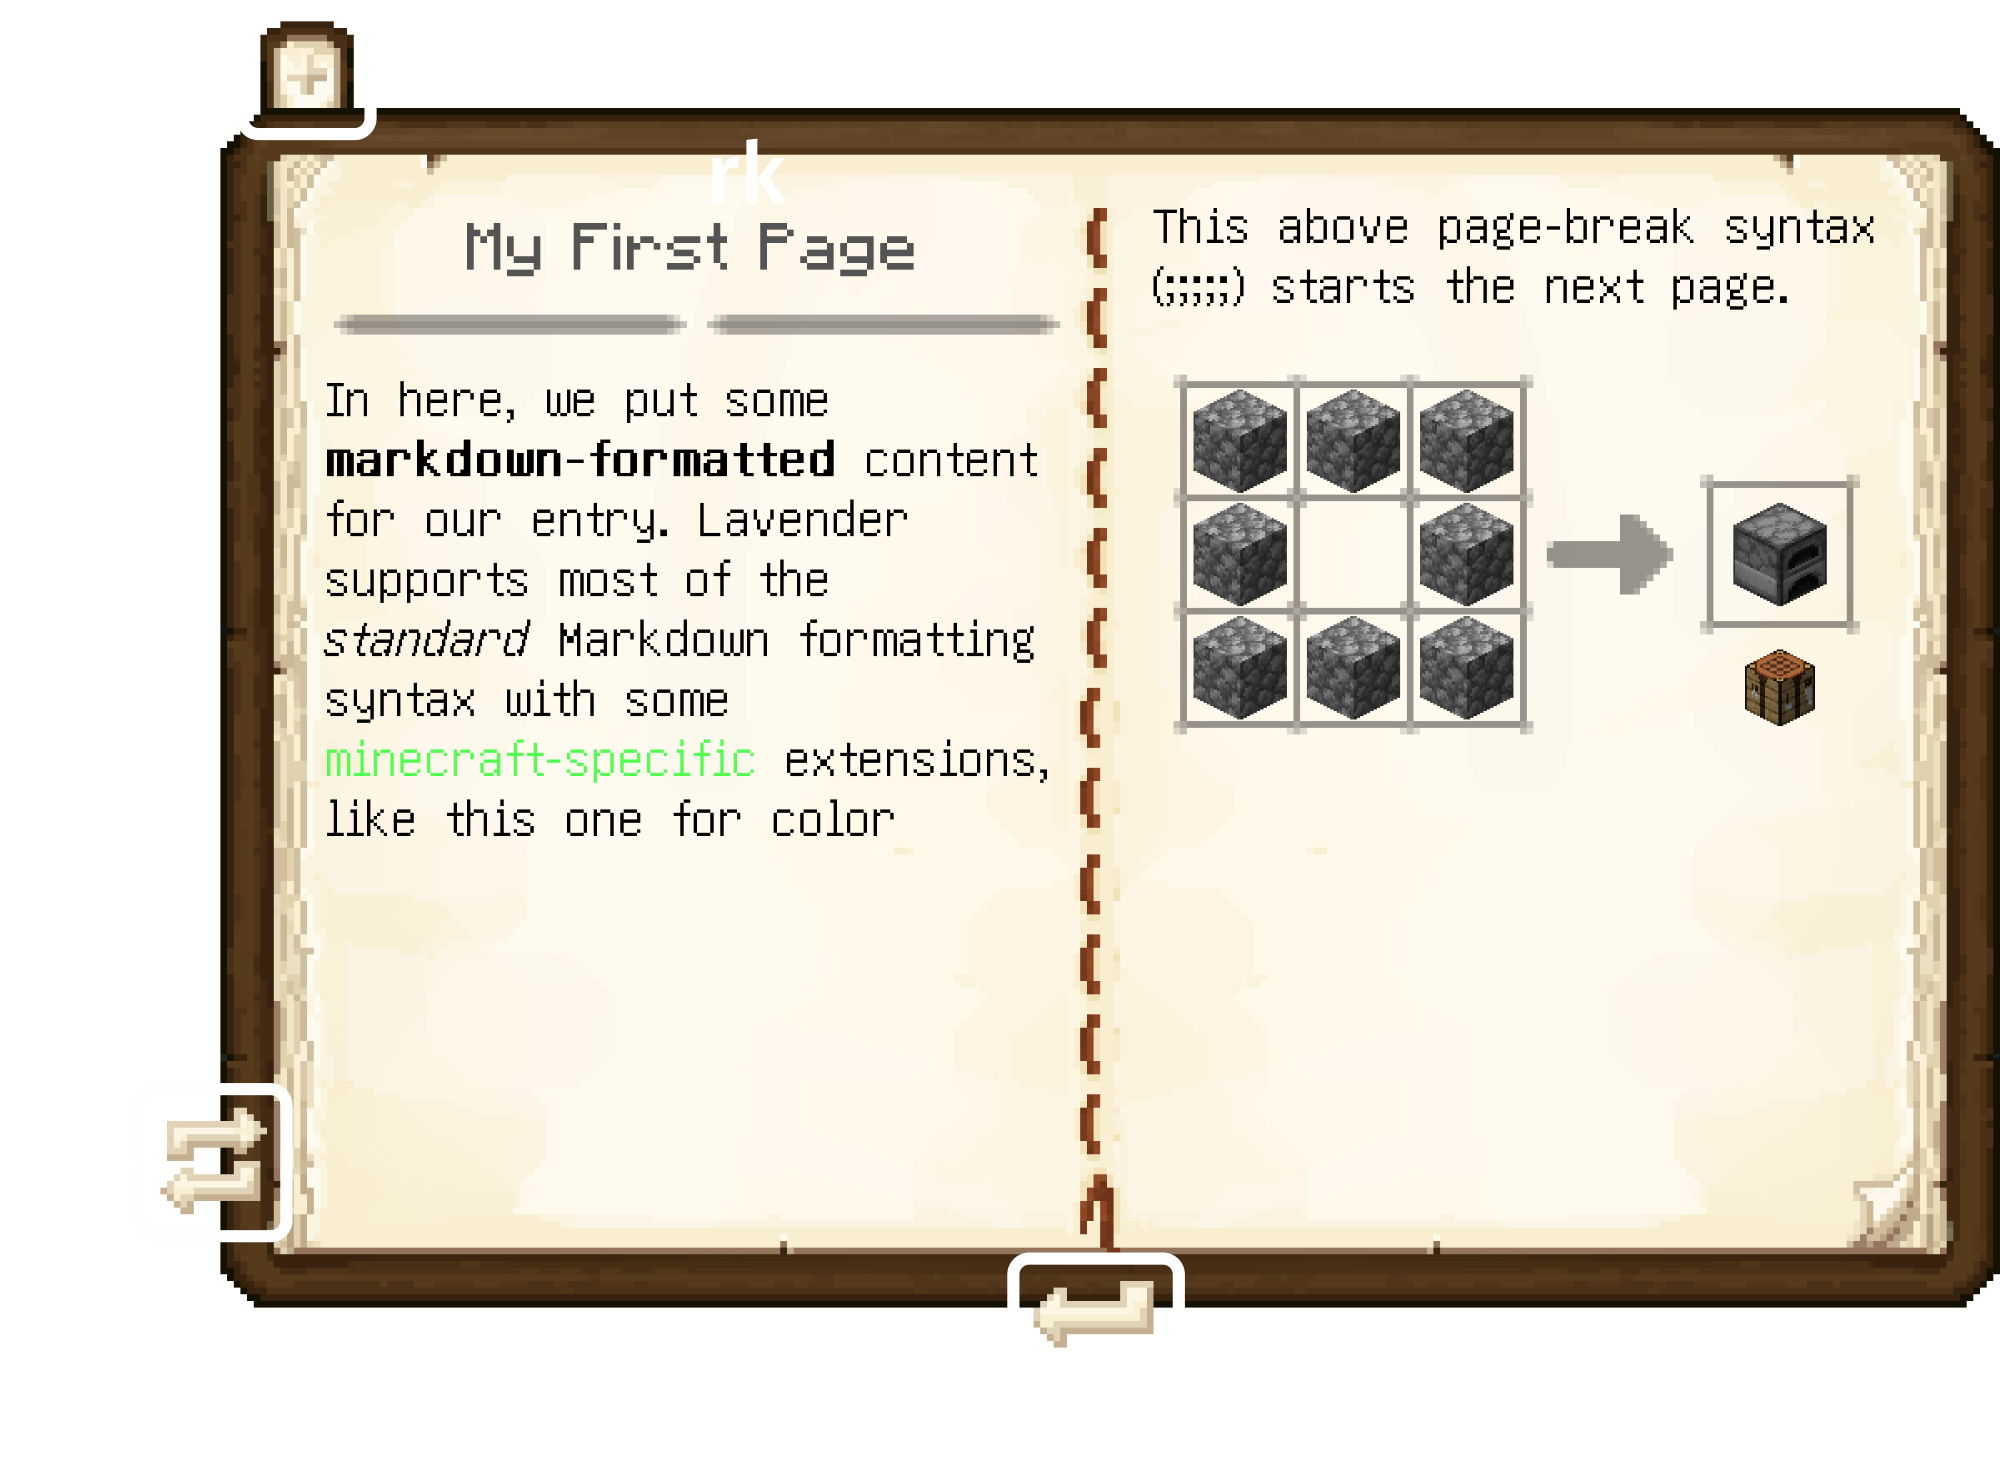
Now that we have our book defined, let's start by adding a first entry. To do this, since our book is called my_book, we add my_first_entry.md into assets/mymod/lavender/entries/my_book/ and give it the following content:
```json
{
  "title": "My First Page",
  "icon": "minecraft:quartz",
  "associated_items": [
    "minecraft:nether_quartz_ore"
  ]
}
```

In here, we put some **markdown-formatted** content for our entry. Lavender
supports most of the *standard* Markdown formatting syntax with some
{green}minecraft-specific{} extensions, like this one for color

;;;;;

This above page-break syntax (;;;;;) starts the next page.
<recipe;minecraft:furnace>
At this point, you're ready to open your book for the first time! Go ahead and start the game (or, if it is already running, do a resource reload with F3+T) - Lavender will now have loaded your book and the first entry we just wrote. To get yourself a dynamic book for testing, run /get-lavender-book mymod:my_book. Then, after opening the book and selecting your entry, you'll be greeted by the following screen:
The reload button and you
The reload button helpfully outlined in the above figure is only visible while running in oωo's debug mode and, when pressed, instantly reloads all book content (this includes book definitions!) from disk without having to sit through an entire client resource reload.
With this, however, it is important to note that neither Gradle not IntelliJ provide your mod assets directly from the source and instead copy them to some temporary directory. Thus, to properly sync your changes to the running game, you need to either rebuild or directly invoke IntelliJ's "Reload changed classes" action, after which you can do a reload and see your changes in-game
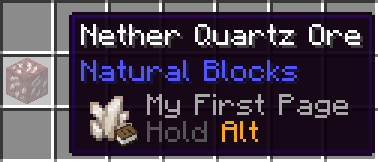
Further, if you take out some Nether Quartz Ore and hover it while having the book you just made in your hotbar, you'll see that (just as declared) the entry is referenced in the item's tooltip:
Adding Categories
Now that we have made an entry (and it should hopefully be abundantly clear how to create more of them), let's move on to creating a category. Analogously to entries, categories must be placed in the assets/mymod/lavender/categories/my_book/ directory of your mod's resource pack (specifically, we'll save it as a_category.md). The format for categories, as you can see below, is very similar to entries - only the frontmatter is slightly different:
```json
{
  "title": "A Category",
  "icon": "minecraft:dirt"
}
```

Just like __entries__, categories fully support **markdown formatting**.
Be careful when writing their descriptions however, as you only get a
single page to work with.
Now, in order for your category to actually show in the book, at least one entry must be inside it. To this end, modify the frontmatter of the entry we made previously:
```json
{
  "title": "My First Page",
  "icon": "minecraft:quartz",
  "category": "mymod:a_category", // new boi here
  "associated_items": [
    "minecraft:nether_quartz_ore"
  ]
}
```

...
After making these changes, sync them to your game instance and press the reload button to see them in action! You'll also have noticed by now that Lavender can handle entries without a category (contrary to what you might be used to from Patchouli). This can be quite useful if you have an introductory entry that doesn't really belong anywhere else or if your mod is just not complex enough to warrant multiple categories.
Finishing up
To end of this introductory tutorial, we'll add a landing page entry to the book to replace the smiley face greeting you upon opening it thus far. Luckily, this is as easy as creating an entry directly inside assets/mymod/lavender/entries/my_book/ which is simply called landing_page.md - it will automatically get picked up and displayed
Further reading
While this introduction should get you up to speed on writing basic documentation, there's a lot more that Lavender has to offer in terms of Markdown syntax and metadata. To read more about this, check out the following articles:
- Metadata Format holds information on all flags and other metadata you can put into the frontmatter of both entries and categories
- Markdown Syntax is a comprehensive reference of all syntax elements supported by Lavender's Markdown implementation
- Writing Extensions outlines the process of extending another mod's book with your own entries and categories - very helpful when making an add-on for another mod