Datapack Tutorial
Knowing how to create a datapack is essential when creating new recipes like within Alloy Forge or configuring trades like in Numismatic. If you already know how to create a basic datapack you can start making recipes.
Creating a Datapack
Creating a basic datapack is fairly simple. To start out you need a folder or a zip file that contains the datapack.
The main components for a datapack:
- A pack.mcmeta file, which tells Minecraft what versions your datapack supports.
- A data folder, which contains all the data of your pack.
These are required for any data pack. If you look at any example you will find these folders. This tutorial will teach you how to format these.
At any point where JSON is used, using a JSON checker like JSONLint is useful for catching bad formatting, especially comma errors.
The pack.mcmeta file
A .mcmeta file is just a JSON file with a custom extension. The file usually looks something like this:
pack_format file determines what versions of Minecraft your datapack supports.
You can still load outdated packs, but the game warns you about loading them.
To create this file you can simply save/edit a text file with the .mcmeta extension.
Currently for 1.19+ the pack format is 10.
For 1.18.2 its 9, for 1.18 to 1.18.1 its 8,
and for the 1.17 versions its 7.
For future versions of Minecraft this can change, and the best page to find the latest number is on the Minecraft Wiki.
If you are struggling with creating the file, you can simply copy a mcmeta from ANY datapack. It's not stealing.
The data folder
The data folder frankly contains all your data files. When putting data inside you separate it using folders. The first folder you create is a namespace.
A namespace is a core/root folder, which prevents conflicts with data from other places.
The standard structure for your pack would be data/namespace, and in this folder you put your data.
Having limitless possibility can cause some confusion between packs (for the better), which is why Minecraft only loads specific things from specific folders.
An example is the fact that recipes will only be loaded under a recipes folder. A list of folders that work this way are:
- advancements
- dimensions
- functions
- loot_tables
- predicates
- recipes <--- This one is the most important for Alloy Forging
- structures
- tags
- worldgen
When putting files inside these main folders but you can create subfolders to sort it as you please.
Note that every file and folder inside the data folder MUST BE LOWERCASE.
Packing the datapack
Once you are done with creating your datapack it is likely you want to share it around. The simplest way to do this is to create a zip file out of it.
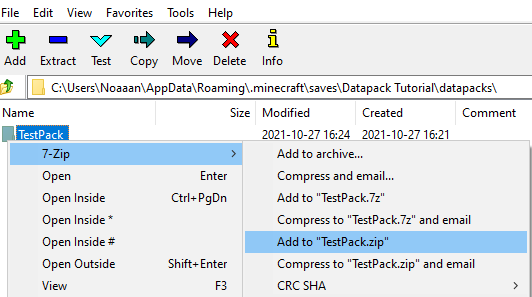
For this tutorial I will be using 7zip, and I will create a zip file of the folder.
To do this I open up 7zip, find the datapack I have created, and create a new zip file from it.
NOTE! By zipping in this particular way you will have to extract the folder out of zip file in order to use the datapack.
If you instead create a zip file which only contains the data itself (data folder and .mcmeta file), you can import/install it directly.
You can send this zip file to your friends, who can install it by extracting the folder into their datapacks folder for the world they want to install it in.
Example Datapack
Now to try to create a datapack!
To get started we will do the following:
- Create a new single player world (with cheats enabled)
- Exit back to the menu
- Navigate to the world we created
- Click "Edit World"
- Finally, click "Open World Folder".
Then we will head into the datapacks folder, where we can create our datapack.
NOTE! that when we are done with this we can turn this folder into a zip file, and then install it on other worlds/servers.*
First we will create the pack folder, which can be named anything you please. For this example we will call it "TestPack".
Inside we create a pack.mcmeta file, and an empty data folder. Since I am playing on 1.17.1 I set the pack_format to 7 and give it a description.
Now we open the world again, and as long as the datapack was properly formatted it will be loaded automatically.
We can verify this by running the command /datapack list. If done correctly it should load!

Now we can add something to the pack which could be useful. Considering we are making an Alloy Forgery recipe later, we should probably add a tag which we can use in our recipes. I want to be able to smelt certain stone blocks into deepslate using an Alloy Forge.
NOTE! At this point you do not need to go back to the main menu when changing things, as you can run the /reload command to reload the datapack.
Creating a tag
We start by creating a new folder inside data, which determines the namespace for the pack. We will choose based_tutorial for this.
Then we create a tags folder.
As of the later version of Minecraft you can create tags out of almost anything. Biomes, Entity Types, Blocks, Items, you name it.
How datapacks load tags is dependent on the subfolders inside the tag folder.
If you are creating an item tag you must place the tag under a /tags/items/ folder, or it will not register it.
Since Minecraft separates block and item tags we will create an items folder and place our tag there.
NOTE! Mixing blocks and items in an item tag is fine, but doing it in a block tag will fail.
Inside it we create a new tag file called "rocks_and_stones.json". Tags has to be JSON files (Most files in datapacks are .json files).
The structure of the file looks like this:
replace boolean here decides if the tag should be overwritten.By default this should be false. The reason being that other mods/datapacks may want to be able to add new values to this tag.
The
values field is an array, and contains all the blocks or items you want in the tag.
NOTE! If you create a tag with the same namespace and path of another tag (I.E: minecraft:gold_ores) you can add to it or overwrite with the replace boolean. This also works for recipes!
We can now test to see if this tag exists in the game. We will use /reload to reload the datapack, and then we will use the /clear command, which supports removing tags from your inventory!
If done correctly we can now remove andesite, diorite, and granite, with the tag, from our inventory!

Creating a recipe
We will now use the tag we made to make a recipe!
To start out we need to create a new folder under our namespace called recipes.
NOTE! Under this main folder you can put the recipe anywhere you want, since Minecraft's recipe manager loads everything in this folder recursively.
Here is an example of what the recipe folder from Mythic Metals looks like inside:
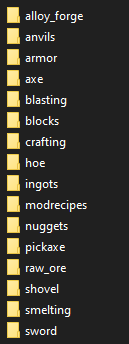
NOTE! The identifier of a recipe will include folders in the name. For Mythic Metals a recipe for an Adamantite Sword has the identifier mythicmetals:swords/adamantite_sword. Note the slash.
For our pack we will simply create a new JSON file inside the recipe folder called deepslate_from_stones.json.
Inside it we write our new recipe. A regular smelting recipe looks something like this:
{
  "type": "minecraft:smelting",
  "ingredient": {
    "tag": "based_tutorial:rocks_and_stones"
  },
  "result": "minecraft:deepslate",
  "experience": 0.2,
  "cookingtime": 200
}
type decides what is using your recipe, like smelting or shapeless crafting. You can find a list of vanilla recipe types here.
- ingredient is an object that contains either an item or a tag, which is used in the recipe. The object inside contains the identifier of either the tag or the item, depending on what you picked.
- result is the item output of the recipe. Note for vanilla this only accepts single items.
- experience is the amount of experience dropped when completing a smelting recipe.
- cookingtime is how long it takes for the item to smelt.
The type is used in all recipes, but the other objects can vary depending on what you are making.
For more in-depth info check out the Minecraft Wiki.
After running /reload again, and using /recipe give @s *, which gives us all the recipes, we can now see that the recipe appears in-game!